the k8s rabbithole (#5) - Rancher v2.6 with DNS-01 TLS/SSL Certificates (via Let's Encrypt and Cloudflare)

Having learned a bit about Kubernetes, Rancher and K3S, I've decided I don't like how I setup Rancher originally. I'd like to set it up on a single-node k3s installation, with dns-01 based TLS certificates, at rancher.windowpa.in, without exposing it to the outside world.
There's precious little guidance on how to set up Rancher 2.6 with Cloudflare/Let's Encrypt DNS-01 TLS/SSL certificates, so this post will serve as a tutorial of sorts for those lucky enough to stumble upon it, too, as well as notes for my own sanity.
First order of business - destroying the old docker-based Rancher installation.
wings@k8s-deployer:~$ nano docker-destroy-all.sh
wings@k8s-deployer:~$ chmod +x docker-destroy-all.sh
wings@k8s-deployer:~$ ./docker-destroy-all.sh
41fe967e7f4a
41fe967e7f4a
Untagged: rancher/rancher:latest
Untagged: rancher/rancher@sha256:51658639bf2b28f4796e7daa04b0434e29fcf69ce062bf649462be77ae76cd2c
Deleted: sha256:ec97968cb7d3e447dd1b81af4ee1b65b2c087b2db5690697b3ee7e048d867071
Deleted: sha256:7ab8ac7561dfafeb43aba9c5e8ca1601a958295b179def4703f5915ffe1027b3
Deleted: sha256:a1f714becfe15885e5ba34fb715edd675eac6603f3beaaa846589be6bdd8f45d
Deleted: sha256:675da117dc091b2eddb947f2795f68f050256eb03a26bcf158b8ef828a7f92e2
Deleted: sha256:6c67d0c161c9c3fd8b6293ab0d54168353b1fa71a215f39734a07b66b05e772d
Deleted: sha256:7525ef9059e1de55b1059ea44f97dbf721b5c1068f56a5506ee1772fb1fe3322
Deleted: sha256:c6235b48a019cafcfd1fd5d51e90dd20e90e53193a6eb9e05b2676203d280888
Deleted: sha256:96042d6e8f19937ccd2f561f0f6a3f7e95dbc596e0566fce7e71cceddfff7a35
Deleted: sha256:2f18d02fba9ad2e3f22631e32130ad2153d149f0d1e5fdef2282ce95fc4f9b59
Deleted: sha256:535bf824bf55a4ac5ed6253ef3b9dbc0c58039fb49cd88a24e337b653a22761f
Deleted: sha256:379abdd6465bcd1d3ba0adc38ffc3ed3ed0a044c1e727a9fce53148fb4ccb102
Deleted: sha256:3ae2c7bd78216edef203f34ac1e00acada4fd276250a4be754104605f415c5ff
Deleted: sha256:befe51705744cda5d05bbbada2b0aab6bfeacbd33b777af54f33a02e0471c1f3
Deleted: sha256:a5d64011666f260fb5f141961b2f7c0b4056e804eeb4aa4627fd4a94fd650e24
Deleted: sha256:aef36c978c364672828ddf7baff9475e29c0a062b3696f2f2ad667c76dd52c31
Deleted: sha256:fd477dc87caf4ce174b84667fa35b1e8d373c4f9ddd64d139c916ce09f15aad5
Deleted: sha256:e5f0de5d87642426b5a757dc47937baafae721b37388ceec2ff891898b4e97be
Deleted: sha256:e9775a74a86b51447f927aea0f090463e681497b06df5b8cd2bf561bd35f14a8
Deleted: sha256:86e1a24b7189d95bd23bdfa81d1cafe8c0ff0200e40f07f83b2aaea312d73300
wings@k8s-deployer:~$
With that out of the way, we can install Rancher on Kubernetes directly (as opposed to Rancher Server/Rancher on K3s on Docker). Per https://rancher.com/docs/rancher/v2.6/en/overview/architecture/, we'll go with a single node k3s installation, because it's easy and doesn't consume a ton of resources.
Easy as:
wings@k8s-deployer:~$ curl -sfL https://get.k3s.io | sh
wings@k8s-deployer:~$ mkdir ~/.kube/
wings@k8s-deployer:~$ sudo cp /etc/rancher/k3s/k3s.yaml ~/.kube/config && sudo chown wings:wings ~/.kube/config
wings@k8s-deployer:~$ export KUBECONFIG=~/.kube/config
wings@k8s-deployer:~$ kubectl get nodes
NAME           STATUS   ROLES                  AGE   VERSION
k8s-deployer   Ready    control-plane,master   99s   v1.22.5+k3s1
And even that is far more complicated than it needs to be. For clarity, I installed k3s, then created a copy of its kubeconfig file in my local user, then finally did a "kubectl get nodes".
To get access to the rest of my tooling, I copied the kubeconfig to my M1, and changed the access URL to rancher.windowpa.in instead of 127.0.0.1.
wings:~/ $ kubectl get nodes                                          [4:35:11]
NAME           STATUS   ROLES                  AGE     VERSION
k8s-deployer   Ready    control-plane,master   3m39s   v1.22.5+k3s1
And bam, my M1 can suddenly talk to the new K3S single-node "cluster".
Let's install Rancher's prerequisites:
wings:~/ $ helm repo add rancher-stable https://releases.rancher.com/server-charts/stable

"rancher-stable" has been added to your repositories
wings:~/ $ kubectl create namespace cattle-system                     [4:36:38]

namespace/cattle-system created
wings:~/ $ helm repo add jetstack https://charts.jetstack.io          [4:36:58]

"jetstack" has been added to your repositories
wings:~/ $ helm repo update                                           [4:36:59]

Hang tight while we grab the latest from your chart repositories...
...Successfully got an update from the "jetstack" chart repository
...Successfully got an update from the "rancher-stable" chart repository
...Successfully got an update from the "halkeye" chart repository
...Successfully got an update from the "common" chart repository
...Successfully got an update from the "stable" chart repository
Update Complete. ⎈Happy Helming!⎈
wings:~/ $ helm install cert-manager jetstack/cert-manager \          [4:37:07]
  --namespace cert-manager \
  --create-namespace \
  --version v1.7.0 \
  --set installCRDs=true
Once that's done, install Rancher.
wings:~/ $ helm install rancher rancher-stable/rancher \                                            [8:04:45]
  --namespace cattle-system \
  --set hostname=rancher.windowpa.in \
  --set replicas=1 \
  --set ingress.tls.source=secret \
  --create-namespace
NAME: rancher
LAST DEPLOYED: Fri Jan 28 08:05:24 2022
NAMESPACE: cattle-system
STATUS: deployed
REVISION: 1
TEST SUITE: None
NOTES:
Rancher Server has been installed.

NOTE: Rancher may take several minutes to fully initialize. Please standby while Certificates are being issued, Containers are started and the Ingress rule comes up.

Check out our docs at https://rancher.com/docs/

If you provided your own bootstrap password during installation, browse to https://rancher.windowpa.in to get started.

If this is the first time you installed Rancher, get started by running this command and clicking the URL it generates:


echo https://rancher.windowpa.in/dashboard/?setup=$(kubectl get secret --namespace cattle-system bootstrap-secret -o go-template='{{.data.bootstrapPassword|base64decode}}')


To get just the bootstrap password on its own, run:


kubectl get secret --namespace cattle-system bootstrap-secret -o go-template='{{.data.bootstrapPassword|base64decode}}{{ "\n" }}'


Happy Containering!
(Note, the output of the command above was slightly edited. Specifically, some backticks were removed :))
Now let's get a valid TLS/SSL certificate...
We need to create three files, roughly according to https://cert-manager.io/docs/configuration/acme/dns01/cloudflare/ - I've left out sensitive information for security reasons, but this should give you a good idea as to what's required. These are cloudflare.yaml, issuer.yaml and certificate.yaml (the naming doesn't matter, but these names made sense to me :))
cloudflare.yaml:
---
apiVersion: v1
kind: Secret
metadata:
  name: cloudflare-api-token-secret
type: Opaque
stringData:
  api-token: <REDACTED>
issuer.yaml:
---
apiVersion: cert-manager.io/v1
kind: ClusterIssuer
metadata:
  name: letsencrypt-prod
spec:
  acme:
    server: https://acme-v02.api.letsencrypt.org/directory
    email: example@acme.com
    privateKeySecretRef:
      name: letsencrypt-prod
    solvers:
      - dns01:
          cloudflare:
            email: example@acme.com
            apiTokenSecretRef:
              name: cloudflare-api-token-secret
              key: api-token
certificate.yaml
---
apiVersion: cert-manager.io/v1
kind: Certificate
metadata:
  name: tls-rancher-ingress
  namespace: cattle-system
spec:
  secretName: tls-rancher-ingress
  commonName: rancher.windowpa.in
  dnsNames:
  - rancher.windowpa.in
  issuerRef:
    name: letsencrypt-prod
    kind: ClusterIssuer
Once those are created, apply them to create the Cloudflare secret, create a ClusterIssuer that can request and issue certificates, and finally request a certificate from the issuer. Whew!
# Create Cloudflare secret
kubectl apply -f cloudflare.yaml --namespace=cert-manager
# Create a ClusterIssuer
kubectl apply -f issuer.yaml
# Request a certificate
kubectl apply -f certificate.yaml
If you're quick, you can check out the DNS challenge as it happens:
wings:homelab-dns/ $ kubectl describe challenge -n cattle-system             Name:         tls-rancher-ingress-nb2bd-3206036943-634944680
Namespace:    cattle-system
Labels:       <none>
Annotations:  <none>
API Version:  acme.cert-manager.io/v1
Kind:         Challenge
<snip>
Spec:
  Authorization URL:  https://acme-v02.api.letsencrypt.org/acme/authz-v3/72586739380
  Dns Name:           rancher.windowpa.in
  Issuer Ref:
    Kind:  ClusterIssuer
    Name:  letsencrypt-prod
  Key:     <redacted>
  Solver:
    dns01:
      Cloudflare:
        API Token Secret Ref:
          Key:   api-token
          Name:  cloudflare-api-token-secret
        Email:   zorlin@gmail.com
  Token:         <redacted>
  Type:          DNS-01
  URL:           https://acme-v02.api.letsencrypt.org/acme/chall-v3/72586739380/RUURBA
  Wildcard:      false
Status:
  Presented:   true
  Processing:  true
  Reason:      Waiting for DNS-01 challenge propagation: DNS record for "rancher.windowpa.in" not yet propagated
  State:       pending
Events:
  Type    Reason     Age   From          Message
  ----    ------     ----  ----          -------
  Normal  Started    16s   cert-manager  Challenge scheduled for processing
  Normal  Presented  13s   cert-manager  Presented challenge using DNS-01 challenge mechanism
After 60-90 seconds, the DNS challenge is complete and the certificate is magically issued:
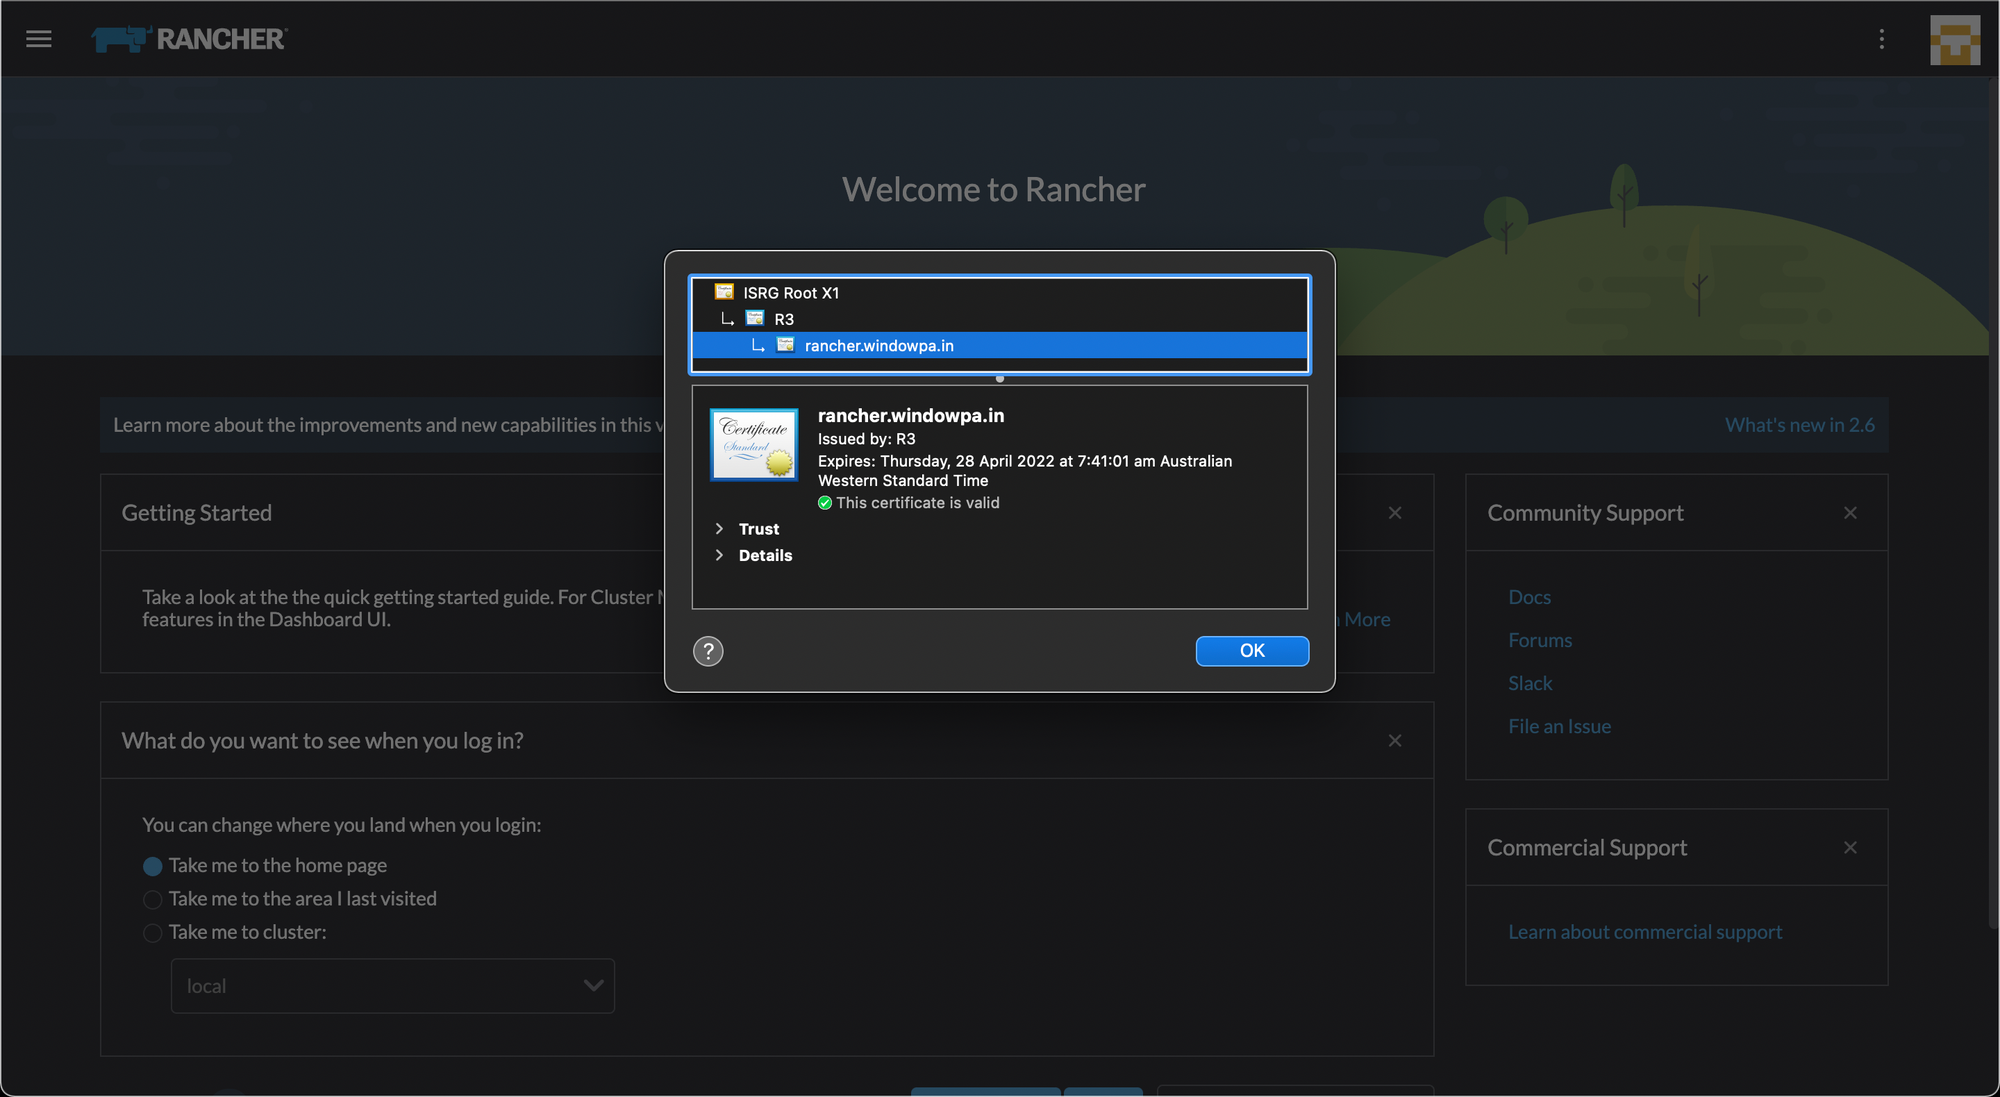
We have a working TLS certificate, and a secure HTTPS connection! Success!
While this blog post seems relatively straightforward, it wasn't all kittens and rainbows... lots of poking was needed to figure this out completely, and at one point I switched my Rancher host from Ubuntu to Debian to try to solve a mysterious DNS/Let's Encrypt issue (/etc/resolv.conf - maybe something for another post?)
Anyways, that's all the adventures for today.